Wednesday, September 30, 2015

DF4 10/1/2015

We started off class by simply by creating our symmetrical shapes.

Making our symmetrical shapes

Working very hard with our best friends (well sort of)
After making our symmetrical shapes, we printed our model out by using this very cool printer.


This is how the printer works:


When the printer finished, this is what the product looked like:


Homework: . If you already printed your symmetrical shape, then you Have no homework If not, then Finish Designing your shape on the AutoCAD program and BE ready to Print it out next class.
***Week 6 blog post by Monday morning***

9/29 DF 2


 Today in class we worked on autocad designing and creating shapes for a geodesic structure. This was the first time the majority of us had used this program and it was sort of challenging to maneuver and create the shapes you wanted. The day was slow but once we all knew what we were doing we all got super into and started creating cool shapes for this project.

30/9/15 3D Design

Today we did part 2 of the presentation and we got through the last 3 remaining groups. We also started working on fusion 360 however most of us weren't able to go it since it took a while to download.

Homework: N/A


Monday, September 28, 2015

9/29 DF4

Some people were able to create their shapes.
Today in Class we mainly played around on AutoCad. The day started off slow with Ms. Sutter helping out those who did not have AutoCAD already on their computer. Once everyone had AutoCad up and running Ms. Sutter showed us some of the basic functions and tools in AutoCad. Then we were off on our own playing around with AutoCad and becoming familiar with the program. We learned some tools in the program like exploding and creating polar arrays. By the end of Class everyone had a pretty strong understanding and could of create their shape they designed on paper onto the program.

playing around with autocad
HOMEWORK: For Homework due next class please be finished or work on your design in AutoCAD.

9/28 3D Design

Today we finally started presentations we worked on since 3 weeks ago.
We didn't have enough time, so we only got thru 5 groups (including house ware, medical, robotics, fashion, architecture).

Fashion group
Robotics group


Architecture group

Saturday, September 26, 2015

9/24 3D Design

We worked on our presentation that we will give on Monday.  Some of us also used the laser cutter to cut our paper lanterns out.  The homework is the blog and work on presentation for Monday.


9/25 DF4


Today we had to work on making ideas for our new unit, we started out thinking of about 20 designs that we could cut out using the laser cutter. The next step was to narrow those 20 down to 3. Finally, by the end of class we had to choose one design that we would use for the laser cutter and sketch it out like we did above. The homework due on MONDAY is to finish the week 5 blog post. 


Friday, September 25, 2015

25/9/2015 3D Design 7

Today, or rather Yesterday we worked on getting our presentations in working order.  Making sure each person knows what to say and how to say it.

A Video slide

Hopefully by Monday next week, no one will be caught off guard on the presentation!

Homework:
Week 5 blog post
Download & Install Fusion 360


Week 5 Prompts Due 9/29 8am

Week 5 Blog Prompts Please note that each class has suggested photos to include in the blog posts, plus prompts to answer - in some detail! - for that week's post. 
3D Design Photos to include: Photo of the finished lantern if it's done - with lights on and in the dark with the candle & Photo of the laser cutter cutting your lantern (or short video snip) 
Screenshot of work you were doing on your presentation  ADD IN AT LEAST one photo of a cool thing cut on a laser cutter that you found online
Prompts:

  • What aspect of your topic are you responsible for speaking on, and why did you pick that part of your topic?
  • What is the most interesting point you've found in your research?
  • What do you find most fascinating about the laser cut object you chose to feature from online resources?
  •  Is there any one thing (or type of thing) you want to design first in Fusion 360?
Design & Fabrication 2, 4
Photos: Photo of your sketched ideas for the shape, the final 3, and the one you are working on for yourself.


EMBED your shared google doc (MAKE IT PUBLIC to anyone with a link) of the circuit project documentation.
 
Prompts:

  • When you shared the process of making your project(s) in the documentation, what did you learn about the level of detail you need to include? How does that balance with making it generic so people can use your directions to make their own version of the project? 
  • What surprised you about what you need to include in a "how-to" or documentation document?
  • What suggestions do you have about making a brainstorming session more productive for you? How about for a group?
  • What do you like best about the shape you are selecting to create in AutoCAD in class next week? 
Please have your blog post done by Monday 9/29 at 8:00am (all classes), although earlier is always welcome.  Email me if you have any questions or issues.
Ms. Sutter

9/23 DF4

Today in class, we reflected on our LED light circuit cards. We were divided in to groups of three or four, and worked on one Google doc with one person in charge of a certain question/explanation.

We explained what we learned before the whole crafting process, what we based our projects on/inspirations, the How-To steps on creating a working circuit card like ours, and things we would have improved or changed.

This is an example-snippet from my group's document: (Credits to Connor and Zen!)

How To: Making A Paper Circuit

Tools: Scissors, copper tape, battery, LED lights, Exacto knife, tape, cutting mat, material to construct card/object out of (e.g. cardboard, colored paper), etc.
Time needed: 30-45 Minutes
Experience level: Little knowledge of circuits
Overview of project: This project is both fun and interesting as it engages the maker in many ways. The feeling that comes when you finally make your circuit work is a real amazing moment. Although it takes a while to get into, it is really worth the effort. It is a great learning experience and teaches you a lot about circuits and how we can incorporate our learning about this in our real world.

Step By Step Guide:

Step 1: Brainstorm ideas for your circuit and gather necessary materials.

Step 2: Plan your card or object by sketching or outlining it on paper.

Step 3: Plan your circuit by considering where the battery, LED lights (and possibly switch) would go, as well as the design and how you will fit it into the card/ object.

Step 4: Start to create your card or object, with regard to where you will place the circuit and where everything will go. This will most commonly be made out of paper or cardboard, with other pieces such as tissue paper included in some parts. Material may vary.
Step 5: Start placing your copper wire, leaving gaps for the battery and LED lights, the way you planned out before.
Step 6: Insert your battery and lights, ensuring that the lights turn on.
Step 7: Finish your card or object by adding finishing touches, such as drawings, color, or additional parts, such as transparent tissue or cardboard pieces.
Step 8: Stare in awe as your circuit lights up right before your eyes.


Thursday, September 24, 2015

9/25 DF2

Sutter sensei showing us what we shall be doing during the class
Today during class we worked on brainstorming shapes for our next project. We made rough sketches of geometric and organic shapes. After that we brainstormed as a class to figure which shape would be best for this project. The homework for tonight is to work on week 5 blog post DUE MONDAY MORNING.
Class working together


Tuesday, September 22, 2015

Class Blog 9/23 DF2

At the beginning of class today, we worked on the Constructible Project Documentation. Taking up the majority of the class, our project assignment was to explain our paper circuits and create a generic guide on how to make them with a group! 

Groups working on their Constructible
Project Document
Rhys working on the
Constructible Project Document
Our end-goal was to convert our document to a PDF for other people around the world to use, and for future classes to know what to expect!

Sunday, September 20, 2015

Sept. 18 DF2

This class we did two things. First, we finished our paper circuit projects which took us about fifteen minutes.
Finishing paper circuits featuring The Swag Mobile Presented by Andrew Howe in the top right hand corner
The rest of the class, we spent installing X-11, Inkscape, and AutoCad/AutoDesk. This took a lot of the class because many of us had problems putting them on our computers. Also, a few people had problems with the installation code.
AutoCad Directions

X-Quartz/Inkscape Download

Friday, September 18, 2015

Friday September 18 Design and Fabrication

For most of today's class everyone worked on their circuits. After we felt our circuit was complete, some of us worked on adding software to our computer including Autocad, Inkscape, and XQuartz. Our weekend Homework is to complete our weekly blog post and make sure that next class we come in with the software on our computer.


Week 4 Blog Prompts Due Tues 9/22 at 8:00am

Week 4 Blog Prompts
Please note that each class has suggested photos to include in the blog posts, plus prompts to answer - in some detail! - for that week's post. 

3D Design
Photos to include: Sceenshot of your final inkscape design file (with strokes large enough to see!) if you didn't have it done in your week 3 post.
Photo of the finished lantern if you got that far - with lights on and in the dark with the candle 
Photo of the laser cutter cutting your lantern (or short video snip) 
ADD IN AT LEAST one photo of a cool thing cut on a laser cutter that you found online

Prompts

  • What was your biggest challenge(s) with your project this week ?
  • What surprised you about the process of getting the laser cutter to cut out your file? (if you didn't get that far, what tweaks have you made to make your project better while you were waiting for access to the laser cutter?)
  • What do you find most fascinating about the laser cut object you chose to feature from online resources?
  • Of the materials listed in the MATERIALS LIST post, what are you most interested in using?
  • I was wondering . . . . 
Design & Fabrication 2, 4
Photos: Photo of project in progress (or early versions if you did several), final finished work, and the final circuit view (behind the scenes, so to speak)
 
Prompts

  • What was the most challenging part of making your circuit project?
  • What would you do differently if you were to do it over again?
  • What did you like best about how your project turned out?
  • What did you learn about basic computer practices as we were installing software on Friday?
  • I was wondering . . .
Please have your blog post done by Tuesday 9/22 at 8:00am (all classes), although earlier is always welcome.  Email me if you have any questions or issues.
Ms. Sutter

9/16 Design and Fab2

Today, we continued to work on our paper circuit. There were lots of interesting creations by everyone, ranging from a house with lights on the inside...
 To a paper crane...
To an airplane runway!

Today was mainly a work day, so everyone was diligently labouring at their paper circuits.
Working hard
Working hard


Working hard
Um... Good effort

Wednesday, September 16, 2015

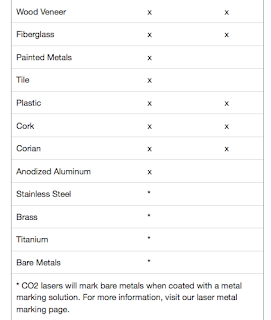
Laser Cut and/or Engrave materials list

We've had some questions about what materials we can cut and/or etch with the Epilog laser cutter. Here's the Epilog website with the list of materials, and further information should you wish to explore: https://www.epiloglaser.com/how-it-works/laser-material-compatibility.htm

Engrave is the left X, Cut is the right X
Here's the grid in two parts:


9/16 Design&Fabrication 4: Toys out of Circuits

Today in class we continued with our LED circuit toys/creations, in hopes to complete it that day (many succeeded, many did not). This has been a good experience for us in terms of learning how the circuit lights work and leading us to inquire how we could make things out of scratch using these materials. 

Below are some examples of the completed creations and how they worked:


This person made a house lighting up, using a switch, circuit tape, a light, and a battery.


Similarly, this person made a house being "abducted by aliens".

Homework:
Make sure you are ready for your next class and can pick up from where we ended last class.

Tuesday, September 15, 2015

9/14 Design and Fabrication 2

Today we continued learning and making paper circuits. In our previous class we made a simple circuit as well as a parallel circuit. Today we took that a step further by making these circuits actually function in a 3D situation.

Above are some examples of the 3D projects students designed today. The circuits run on the back, and depending on the project it turns lights on that move using a switch. As you can see above one circuit is designed to turn lights on in a light house. Another turns lights on in a UFO. 
Todays class was fun and creative, and it was great to learn more about how circuits work in different situations.

Monday, September 14, 2015

9/14 Design&Fabrication 4 Making Circuits

Today we thought of what we could built using circuits. First, most people sketched out an idea of what they wanted to do on a piece of paper, and then cut it out or traced it. Some people took the cardboard paper and decided to make a 3D house and put lights inside or some decided to make a pop up card with something in the middle that lit up. First we took construction paper and made our design and then we decided how to layout the circuit, making the lights turn on. Next class we will finish what we made but here are some images showing what people created,


To make the circuits work, we had to make sure that the lights were touching a negative and positive side because the battery needs to touch both sides. Sometimes it is difficult to make a circuit on something that is very small because you need space for the battery, the lights, and all the tape.

Homework: Think about how and what your going to do next class with your creation.